
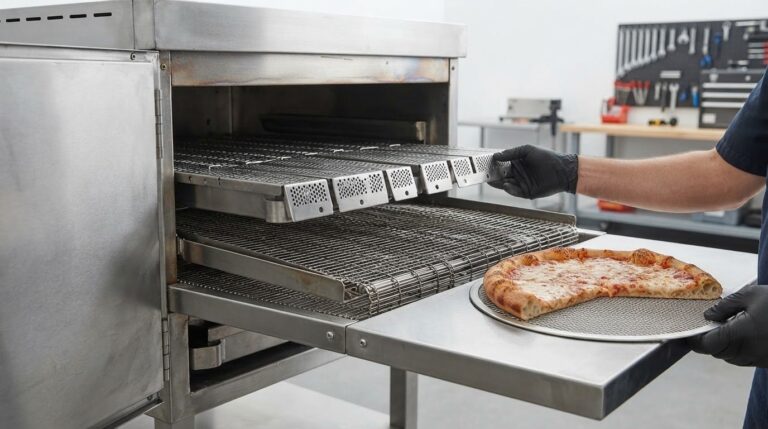
More airflow isn’t always the answer to a crisper pizza crust. Adjusting impingement oven finger configurations for crust crispness starts with keeping the bottom fingers fully open while shaping the top finger profile to suit the bake; for a crisp exterior and tender interior, the recommended air-impingement approach is 450 to 475°F using a screen. High-velocity airflow can create pita-like pockets, so the balance matters.
If your crust browns too quickly, softens soon after baking, or develops bubbles, finger placement is only part of the picture. Dough formulation, crust size and weight, bake time, temperature, and airflow all affect the result. The right combination helps create a crisp exterior while keeping the center soft and chewy.
This guide explains how top and bottom finger positions affect heat across the crust, why oven profiles vary, and how air velocity, temperature, and humidity influence baking. You’ll also learn what to consider before changing a profile, so you can make informed adjustments for the crust you want.
Key Takeaways
- Keep bottom fingers fully open for strong airflow, then consider how the top-finger profile distributes heat across the crust.
- Match finger configuration to the oven and product; profiles can vary by oven type, size, and manufacturer.
- Watch airflow as well as heat: high-velocity air over both sides of the dough can create pita-like pockets.
- Balance temperature and bake time to brown the exterior without leaving the bottom underbaked or the interior too dry.
- Use the crust’s texture and shape to guide adjustments, since dough formulation, size, weight, and finger profile all affect baking.
Adjusting impingement oven finger configurations
Finger positions shape how heated air reaches the product. For a consistent crust, keep bottom fingers fully open and match the top-finger profile to the bake. Successful adjusting impingement oven finger configurations for crust crispness starts with understanding the oven and product, not applying one universal pattern.
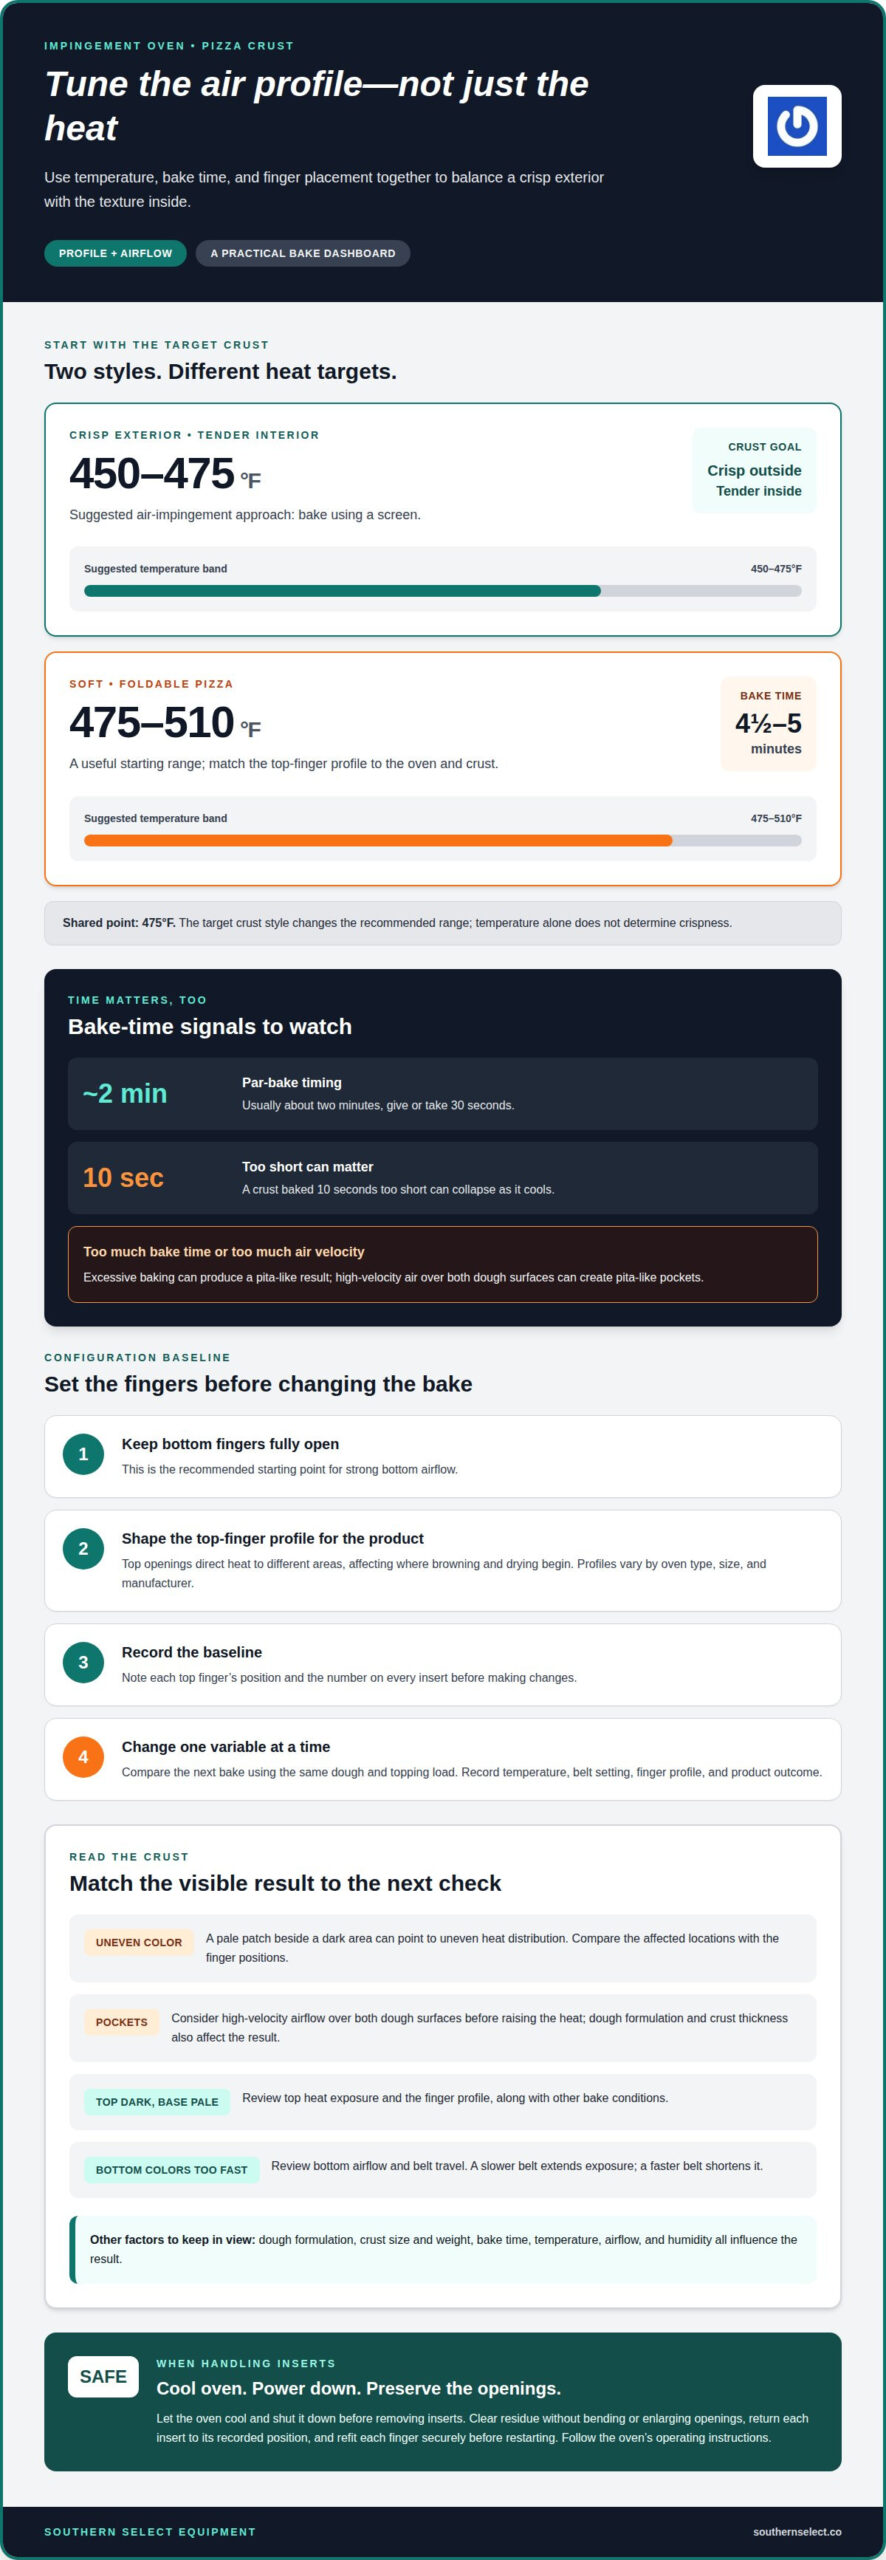
For soft, foldable pizza, a useful starting point is 475 to 510°F, with bottom fingers fully open and the top profile suited to the oven and crust. Bread and pastries need profiles matched to their dough, shape, and desired surface color. Gas or electric design, oven size, and manufacturer also affect the starting configuration. These differences matter because finger profiles aren’t interchangeable across ovens.
Air impingement ovens commonly use fully open bottom fingers and a varied top profile. Top openings direct heat toward different parts of the product, influencing where browning and drying begin. Before changing a profile, note each top finger’s position and the number on every insert. This record establishes a baseline and makes it easier to identify which adjustment affected a later bake.
Moisture Loss, Color, and Bake Evenness
Finger settings influence how quickly heated air removes moisture and colors the product surface. That balance matters because a crust can brown before its interior reaches the desired texture. If one area receives stronger airflow, it may color or dry faster than another. A varied top profile helps distribute heat for the product. Compare top and bottom color across the same bake, then relate uneven areas to the finger arrangement.
Diagnosing Configuration Defects
Configuration-related baking problems occur when airflow doesn’t suit the product or finger profile. A pale patch beside a dark area can indicate uneven heat distribution; pockets in pizza crust can result from high-velocity airflow over both dough surfaces. Compare products from the same run and note where each defect appears. Check those locations against the finger positions before changing the profile.
Par-baking has its own timing demands: it usually takes about two minutes, give or take 30 seconds. A crust baked 10 seconds too short can collapse as it cools, while excessive baking can produce a pita-like result. Soft, foldable pizza crust typically bakes for 4½ to 5 minutes. Dough formulation, crust size and weight, and finger profile all influence the final bake time.
To preserve airflow, clean finger inserts and openings as part of routine oven care. Let the oven cool and shut it down before removing inserts. Clear residue without bending or enlarging openings, then return each insert to its recorded position, since swapping positions changes the profile. When adjusting impingement oven finger configurations for crust crispness, preserve the oven’s intended inserts and airflow paths.
Use caution when changing configurations: work only on a cooled, powered-down oven, handle inserts carefully, and record their original positions. Refit each finger securely before restarting, and follow the oven’s operating instructions. These steps help reduce the risk of burns, damaged inserts, and unintended airflow patterns.
Air velocity, temperature, and humidity controls
Air speed, oven heat, belt travel, and moisture conditions work together to shape a pizza’s baked surface. For soft, foldable crust, the suggested air-impingement range is 475 to 510°F, but temperature alone cannot ensure crispness.
To balance top and bottom heat, start by checking the product’s color and texture after baking. If the top darkens while the base stays pale, reduce the top’s heat exposure by adjusting the finger profile or other bake conditions. If the bottom colors too quickly, review bottom airflow and belt travel. Change one variable at a time, then compare the next bake using the same dough and topping load.
High-velocity air over both sides of pizza dough can create pita-like pockets. This may explain why a crust puffs or develops an uneven interior despite having appealing surface color. Raising the heat is not an automatic fix. First consider whether strong airflow is striking the dough too directly, then assess how the top profile and product position distribute that air. Crust thickness and dough formulation also affect the result.
Belt speed controls how long a product stays in the heated zone. A slower belt extends exposure; a faster belt shortens it. The target bake time for soft, foldable pizza crust is 4½ to 5 minutes, while dough formulation, crust size and weight, and finger profile influence the time needed. Since a belt-speed number depends on the oven and product, use bake time and observed results together rather than applying a universal speed.
Humidity influences how readily a surface dries, so consider moisture conditions alongside airflow and temperature. A crust that remains pale or soft may need a different balance of exposure and drying, not simply a hotter setting. For a crisp exterior with a tender interior, the suggested air-impingement approach is 450 to 475°F using a screen. Compare that result with the 475 to 510°F range for soft, foldable crust; the desired style changes the target.
Record the temperature, belt setting, finger profile, and product outcome for each test. If a Lincoln Impinger oven is part of your operation, its oven configuration is relevant when evaluating these baking variables. A consistent record helps separate airflow effects from changes in dough, toppings, or bake duration.
Use belt speed to control exposure: a slower belt extends baking, while a faster belt shortens it. Adjust the setting based on the product’s observed crispness, not a universal speed or bake-time target.
Airflow direction and nozzle adjustment
Finger nozzles shape where heated air strikes a product, while their arrangement determines how airflow is distributed across the belt. Air impingement uses heated air moving approximately 10-50 m/s to increase heat transfer and remove the boundary layer around food. For pizza, that focused flow can brown a surface quickly, but uneven distribution may leave different areas with noticeably different color or texture.
Think of the top and bottom profiles as complementary, not interchangeable. Bottom fingers are typically fully open, while top fingers use a varied profile. This arrangement provides strong airflow beneath the product while directing heat across its upper surface. If top jets concentrate over one area, that portion may bake differently from its neighbors. For example, a dark center with a lighter edge calls for checking top airflow distribution before changing the overall oven temperature.
Hole patterns and open area influence how much air passes through a finger and where it lands. Inserts in different positions can distribute air differently from a uniform pattern. No single finger profile suits every impingement oven: the manufacturer, oven size, and gas or electric design all affect the top profile. Some ovens also use custom or proprietary designs, so a setting from one oven may not transfer directly to another.
Make profile changes methodically. First, record the number on each finger insert and its current position. Then identify the product area showing the defect, such as a pale edge or overbrowned center. Compare that location with the top-finger arrangement, and change only the relevant configuration before evaluating another bake. Keeping the bottom fingers fully open preserves the recommended maximum bottom airflow while you assess the effects of top-side changes.
Used ovens need particular attention because their fingers may have been moved from the manufacturer’s stock profile. Before purchase, compare both top and bottom profiles with the manufacturer’s stock arrangement. A mismatch may mean the existing pattern reflects a previous product rather than your pizza. If the profile is custom, record the insert positions so you can compare later tests accurately.
For crispness, assess the baked surface and underside together instead of judging a single color patch. A pale underside with a deeply browned top suggests the airflow paths are not producing the desired balance. A localized defect points to the finger positions serving that area; a pattern across the whole product suggests a broader profile or bake-condition issue. Make each change deliberately and keep the previous arrangement as a reference.
Crispy exterior with a soft, chewy interior
A crisp exterior with a tender center requires the dough formula and oven profile to work together. For this texture, the recommended impingement range is 450 to 475°F, with a screen. The screen supports the crust during baking, while the finger profile controls how heated air reaches its surface. Neither setting can compensate for a dough formula that produces a different texture.
Start with the dough’s ingredients. A recommended adjustment for crispness outside and softness inside is adding two- to four-percent sugar. The same guidance recommends increasing fat to at least five percent; some formulas for this texture contain 10- to 15-percent fat. These are formula choices, not interchangeable oven settings, so treat each change as a separate test.
Soft, foldable pizza dough has a different typical profile: flour with 13- to 14-percent protein and about two-percent oil. That combination is useful context when you’re aiming for a pliable center rather than a cracker-like bite. If your target is a crisp shell with a chewy interior, compare your current dough with the desired texture before changing finger positions.
Use a repeatable bake to judge the result. Keep crust size, dough weight, toppings, and screen consistent while testing a finger profile. Then compare the exterior color, underside, and center texture. A browned top alone doesn’t show that the base is crisp or the inside remains tender. Recording these observations helps distinguish a formula change from an airflow change.
At very high impingement temperatures, a perforated baking disk with a sufficiently wide, hole-free edge can help shield the crust edge from strong airflow. This can help when the rim colors or dries faster than the center. Because the disk’s edge changes how air reaches the perimeter, assess the rim and middle separately rather than judging overall color alone.
Consider the crust’s structure as well as its color. Strong airflow over the top and bottom can create pita-like pockets, which may undermine the intended soft, chewy interior. If pockets appear, include airflow exposure in your diagnosis; don’t assume the dough needs more heat. The aim is a crisp baked surface without an interior full of large air pockets.
Make adjustments in a controlled order: settle on the dough formula, keep the screen and product size steady, then evaluate the finger profile. If the crust edge is the main concern, consider the protective disk design; if the interior texture is wrong, review the formula and airflow pattern. Changing one factor at a time makes the result easier to interpret.
What finger nozzle types, hole patterns, and open-area percentages are used for crisp crust?
There isn’t one nozzle type, hole pattern, or open-area percentage that suits every pizza and impingement oven. Finger inserts control how heated air passes through openings and reaches the product, so their design affects airflow distribution. The manufacturer, oven size, and gas or electric configuration all shape an oven’s finger profile. A pattern designed for one oven may not produce the same bake in another.
Open area describes how much of a finger face is available for airflow through its openings. A larger or smaller open area changes air distribution, but the percentage alone can’t tell you where jets land or how the crust will bake. Hole placement matters too. Two inserts with similar open areas can direct air differently if their holes follow different patterns.
That distinction matters when a pizza has a pale center and darker perimeter. Rather than treating open area as a stand-alone crispness setting, consider whether the hole pattern sends airflow evenly across the product. A concentrated stream may intensify baking in one region, while a more distributed pattern can expose a broader area. The result also depends on dough thickness, toppings, and how the pizza travels through the oven.
Finger nozzle designs may be standard or custom to a particular oven. Some air impingement ovens use proprietary profiles, so replacement inserts or alternate patterns must suit that design. Don’t assume a nozzle described as more open will automatically create a crisper crust. The interaction between top and bottom airflow, bake temperature, and product profile determines the finished texture.
For a useful comparison, keep the recipe and bake conditions steady while assessing the installed inserts. Record each insert’s number and position, then note where the crust is pale, overly browned, or uneven. Compare those observations with the pattern of openings facing the product. If an oven has been used previously, its current finger arrangement may differ from the manufacturer’s stock profile. Establish which configuration is installed before interpreting the bake.
Treat exact open-area percentages and nozzle patterns as oven-specific design details, not universal pizza settings. The key question is whether the installed profile distributes heat appropriately for your crust. For a used oven, compare its top and bottom finger profiles with the manufacturer’s stock arrangement before relying on the current bake as a baseline. Record the original insert positions when evaluating a change.
If you’re selecting equipment for a pizza operation, explore commercial oven options with the intended product and baking process in mind.
Southern Select Equipment
Southern Select Equipment offers commercial oven options for food-service operations refining their pizza bake. If you’re weighing oven capacity or choosing equipment for a particular crust style, its selection includes XLT Pizza Ovens, EDGE Pizza Ovens, Lincoln Impinger Ovens, and Conveyor Ovens. These options give you a practical starting point for matching the oven format to your menu and workflow, while the finger profile, airflow, and bake conditions remain key to the finished crust. Share what you’re looking to bake and the equipment you’re considering, and Southern Select Equipment can help you explore its offerings. Contact Southern Select Equipment to discuss your commercial oven needs.
Make Your Next Bake a Deliberate Test
Your next step is to turn the crust you want into a repeatable production target. Choose one product, keep its preparation consistent, and use each bake to guide the next adjustment. A measured approach to adjusting impingement oven finger configurations for crust crispness can help you assess equipment choices alongside your dough and workflow.
For commercial kitchen equipment, Southern Select Equipment offers XLT Pizza Ovens, EDGE Pizza Ovens, and Hobart Mixers. The right fit depends on what your operation needs to produce and how the equipment supports your service. Keep the conversation focused on your menu, space, and production goals so your next equipment decision supports the work ahead.
Contact Southern Select Equipment for help as you plan your next step. With a clear baking goal and a thoughtful equipment conversation, you can move toward a crust your customers will be glad to return for.
Frequently Asked Questions
How do impingement oven finger configurations affect crust crispness?
Finger configuration determines where heated air reaches the crust and how evenly the surface bakes. If one side repeatedly emerges darker, compare that area with the finger positions above it before changing the recipe. Record insert locations and the result of each test. This helps distinguish a profile-related issue from variations in dough thickness, topping coverage, or product placement.
How do top and bottom impingement air velocities affect crust formation?
Top airflow affects surface color and drying, while bottom airflow contributes heat to the base. If a pizza develops large internal pockets, strong airflow across both surfaces may be contributing. Note where pockets appear and whether they recur across products from the same bake. That pattern can help distinguish an airflow-related defect from an isolated dough or shaping variation.
How do oven temperature and humidity or steam affect crust crispness?
Oven temperature influences browning and the rate of baking, while moisture in the baking environment affects how readily the crust surface dries. If the exterior stays soft, review the full bake conditions rather than changing heat alone. Keep the dough and toppings consistent during comparisons, and assess the base after baking. This helps show whether surface moisture or heat exposure is limiting crispness.
How can operators adjust finger height, spacing, and alignment in an impingement oven?
Use the oven’s designed finger inserts and positions rather than improvising changes to their physical dimensions. Before changing a profile, record each insert number and location, then compare the installed arrangement with the oven’s intended profile. A used oven may have a different arrangement. Avoid bending inserts or altering openings, which can change airflow unpredictably. Assess the bake after a deliberate configuration change.